Simple HDR photography with ImageJ |
Story location: Home / photography / |
| 02/Jan/2010 |
This follows from my first attempt at 'HDR-style' photography with ImageJ. I have abandoned my old approach, which used ImageJ macros, and have developed a couple of plugins which are easier to use.
Description of Plugins
The first plugin is a version of Unsharp Masking, which subtracts a blurred version of an image from the original. This can improve local contrast and bring out detail in flat areas.
The second plugin is a modification of the CLAHE (Contrast Limited Adaptive Histogram Equalization) plugin. This performs local histogram equalization on sections of the image. This usually gives better results than the simple Unsharp Mask, but is a lot slower.
Installation
- Download and install ImageJ following the instructions at http://rsbweb.nih.gov/ij/download.html.
- Download the file hdr_.jar. Copy this file into the ImageJ/plugins/ directory.
- Start ImageJ, or select 'Help->Update Menus' if ImageJ is already running.
Usage
The plugins can be found in the 'Plugins' menu, in a 'HDR' submenu.
Both plugins expect a 3-channel TIFF file and can accept 16bit or floating point files. If your camera can save 16 bit RAW files then it may be possible to convert these into TIFF files - check the camera's documentation or any software supplied with it.
After loading the image, select the appropriate plugin from the menu. If 'preview' is selected, a small preview window opens which gives a approximate version of the result. At the moment, this window cannot be moved, so if it appears under the dialogue box, that window will need moving out of the way.
After clicking on 'OK', the plugins process the image and return a processed colour image, and a 3-channel floating point image which holds the full dynamic range and could be used for any additional processing steps.
Unsharp Mask
This plugin has the following options:
- Strength (1-100). Higher values give a stronger effect.
- Blur Radius (1-100). This is the amount of blurring applied to the image which is subtracted from the original.
- Saturated (1-100). After applying the Unsharp Mask, the contrast is adjusted so that a small number of pixels are saturated (set to either 0 or 255). The percentage of pixels is the selected value/10.
Local Contrast
Two options are available:
- Block Size (in pixels). This is the size of the area used to calculate the histogram. The best value depends on the properties of the image.
- Maximum Slope. The CLAHE method increases contrast but will use this parameter to set a maximum contrast. The actual slope is value/10. Higher values give a stronger effect but can also increase noise in areas of flat colour.
Examples of Use
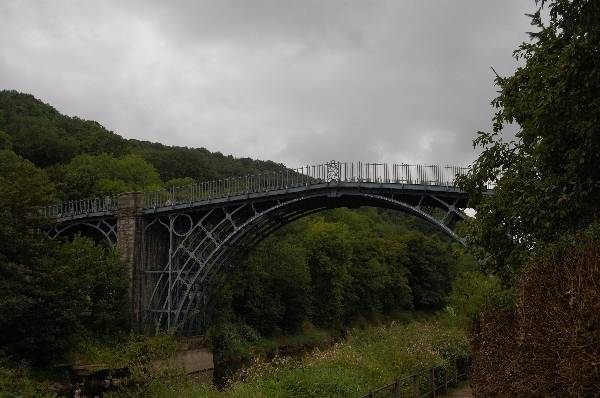
Original image - photograph of Ironbridge in Shropshire, taken on a overcast day with very poor light. The camera was set to its lowest contrast setting to capture the full dynamic range, otherwise the sky would have been burnt out.
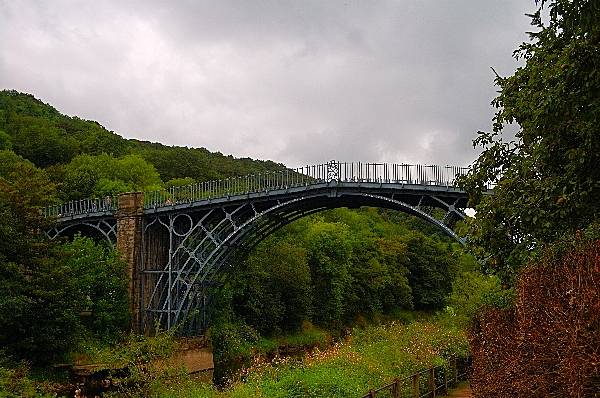
After applying an Unsharp Mask. The whole image has been lightened, with the darker areas being lightened more.
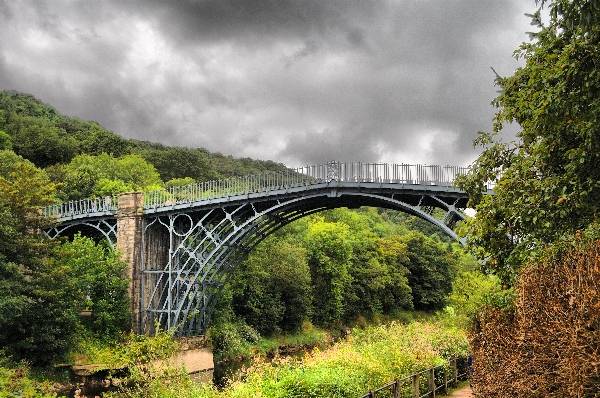
After applying the CLAHE method. The effect is much stronger than the Unsharp Mask, with more detail visible in the sky and better colour in the ground.